Visual Materials
Big Creek, Mono-Bear Diversion

You might also be interested in

Big Creek, Mono-Bear Diversion
Visual Materials
Big Creek, Mono-Bear Diversion - Looking across Mono-Bear Siphon from Anchor #17, Station 78+70, looking southwest. Anchor #16 and expansion joint house adjacent to Anchor #15 show in middle of picture.
photCL SCE 02 - 14725

Big Creek, Mono-Bear Diversion
Visual Materials
Big Creek, Mono-Bear Diversion - Looking northeast over span crossing S. Fork of San Joaquin River. Anchor #15, Station 71+65, in foreground with house over expansion joint adjacent.
photCL SCE 02 - 14724

Big Creek, Mono-Bear Diversion
Visual Materials
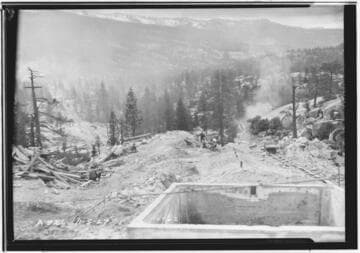
Big Creek, Mono-Bear Diversion - Showing general arrangement at the outlet of the Mono and Bear Tunnels. The open concrete boxes are expansion joint houses, with the main wye being incased in the concrete anchor shown in the center. The small house between the yellow pine tree and the outlet of the Bear Tunnel is for the thermometer installation.
photCL SCE 02 - 14746
Big Creek, Mono-Bear Diversion
Visual Materials
Big Creek, Mono-Bear Diversion - Close-up view of an expansion joint concrete box near Camp 83.
photCL SCE 02 - 14762

Big Creek, Mono-Bear Diversion
Visual Materials
Big Creek, Mono-Bear Diversion - Mono-Bear Siphon with span across south fork of San Joaquin River in foreground wooden trestle still in place.
photCL SCE 02 - 14382

Big Creek, Mono-Bear Diversion
Visual Materials
Big Creek, Mono-Bear Diversion - Arrangement outlet of Mono-Bear Tunnel. Same as [14746] but being a little closer view. A better view of the house for the thermometer installation is shown between the tree and the outlet of the Bear Tunnel. The thermometer for the end of the Mono Tunnel is now installed near the outlet of same and between the portal and the expansion joint.
photCL SCE 02 - 14747